Showing posts with label G Suite for Business. Show all posts

Thursday, May 3, 2018

Canadian G Suite customers can now create Hangouts Meet meetings with US dial-in phone numbers

On April 23rd, 2018 Google announced the availability of dial-in phone numbers for Hangouts Meet. Previously this feature was only available with G Suite Enterprise subscriptions for $25 USD/user/month. Enterprise users still get the added benefit of international dial-in numbers and a 50 user versus 25 user per meeting limit.

The US based dial-in conference numbers work for all G Suite Basic and Business customers for no additional cost. This is awesome news!

We want to highlight that it works great for Canadian organizations too! Most of our customers have flat rate long distance plans in North America so a US based dial-in number is typically of no concern.

If you haven't yet tried Hangouts Meet you're missing out. It's far superior to Skype and even superior to most expensive commercial video conferencing solutions. You can equip your boardroom for high quality video conferencing with Google Hangouts Meet Hardware.

As always feel free to contact us at Interlockit.com with any questions!

Thursday, March 1, 2018

G Suite Calendar Interop: share free/busy data between G Suite and Office 365!

Google has recently released a new version of Calendar Interop which includes the much-anticipated support for Office 365. In light of this--as well as the old version being deprecated--we have run into a few clients that found the available instructions a bit hard to follow.

That's where Interlockit.com comes in to save the day! We're getting straight into the technical details in this post, so put on your geek face and pour yourself a fresh coffee before jumping in.

Prerequisites!


  • Access to a G Suite Super Admin account.
  • Access to an Office 365 Global Admin account.
  • One spare G Suite license to use as a role account.
  • You will need to know how to connect to Exchange Online Powershell and run simple powershell commands.
  • Users must not have matching accounts in both G Suite and Office 365; both systems will prioritize internal users and ignore Calendar Interop if an internal user is found during lookup.

Create role account


In order to facilitate sharing of calendar information between your G Suite and Office 365 tenant, a role account must exist on each side.

On G Suite


  • Sign into your Google Admin Console and go to the Users section.
  • Configure a new regular user account (no admin privileges) with an email address of your choosing. I recommend “interop@yourgsuitedomain.com”.
  • It is recommended this account be used exclusively for calendar interop.
  • Go ahead and set a permanent password right away and keep it ins a safe place. We will need to log in to this account to complete steps later in this guide.

*tip: leave the Admin Console open until you have completed this guide, as you will need it in following steps.


On Office 365

  • Configure a new mail-enabled user (no additional privileges) using the New-MailUser cmdlet in Exchange Online Powershell. Example:

    New-MailUser -Name "Calendar Interop" -ExternalEmailAddress interop@externaldomain.com -MicrosoftOnlineServicesID interop@your365domain.com -Password (ConvertTo-SecureString -String ‘yourpassword' -AsPlainText -Force)

  • The name can be anything, so be descriptive.
  • This email address must not exist in Office 365 as a user or contact. The role account shouldn’t need to receive mail, so it doesn’t really matter what address you use here.
  • This email address must use an accepted domain in Office 365. This address will not accept mail, but behaves like the user ID for the role account on your tenant.
  • Set any password you like. It must be within ‘single-quotes’.
  • It is recommended this account be used exclusively for calendar interop.

*tip: leave Powershell open until you have completed this guide, as you will need it in following steps.

Create an Office 365 availability configuration


In order to give our Office 365 role account the ability to feed free/busy data to G Suite, we must create a new availability configuration and assign it to the role account using the New-AvailabilityConfig cmdlet in Exchange Online Powershell:

New-AvailabilityConfig -OrgWideAccount “Calendar Interop”

Make sure you use the same name in quotes used when first setting up the Office 365 role account.

Configure the G Suite admin console

  • Sign into your Google Admin Console and navigate to Apps > G Suite > Calendar
  • Scroll down and expand the “Calendar Interop Management” section.


Add the availability address space in Office 365

  • From your G Suite admin account, open Google’s Credential Generation Tool. Check the box, and click “Generate new credentials”


  • When prompted, sign in with the G Suite role account you created earlier. It will ask for permission to access calendar data. Click “Allow”.

  • Click “Download”, and save the credentials.dat file somewhere safe--you will not be able to retrieve this file again in the future without breaking the setup, requiring you to repeat all the steps in this section.


  • Click “Choose File” and select the credentials.dat file you downloaded in an earlier step.
  • Select “Exchange 2013 or newer, including Office 365”
  • Enter the user ID of the Office 365 role account, in this example we are using “interop@your365domain.com
  • Enter your G Suite domain in the field asking which address space you wish to add to exchange. In this example we are using “yourgsuitedomain.com”.
  • Click “Show Exchange Setup”.
  • You will be presented with the following page:

  • Copy-paste the above section of green text into Exchange Online Powershell. You may need to hit “Enter” once each command completes, until all the commands have been run.

Create contacts for your G Suite users in Office 365


In order for Office 365 to display the free/busy data for a G Suite user, that user must be represented as a contact in the Office 365 system:


You’re all set!

Now you can create a test event in a G Suite user account and an Office 365 user account respectively, to test that each are able to see the free/busy indicator of the other.

*tip: it may take a few hours for the Exchange Online settings in Office 365 to propagate, so if your initial tests don’t work, wait a few hours and try again before taking troubleshooting measures.

Google provides a Troubleshooting tool but it is limited in functionality. If you get lost, give me a shout over at Interlockit.com and we'll get you sorted in no time! Now, don't you feel like you deserve another coffee?


Thursday, February 15, 2018

Google Drive Backup and Sync for Google G Suite

As we discussed in our prior post Google Drive Backup and Sync plus Google Drive Streaming both work great with your Google G Suite for Business account.

In this post we'll show you how to backup your documents folder, Quicken files, photos and videos with Google Drive.

Google Drive Backup and Sync can both Backup and Sync files to your computer but we recommend turning off the Sync feature and using Google Drive Streaming with your G Suite account. This avoids the consumption of hard drive space and the security risks of storing files locally on your computer.

Download Drive Back and Sync here: https://www.google.com/drive/download/backup-and-sync/ and run the executable to start the installation.

During the initial setup choose the folders you would like to backup, but don't turn on Drive Sync.

Your preferences should look something like this:

Note that we've chosen to backup various folders from the Home Theatre PC (HTPC) including my kid's local user directories where their valuable Minecraft levels are saved. 

We've also enabled the uploading of photos and videos to Google Photos. This way any new photos saved to the selected folders on the local drive from my Sony camera are automatically stored in Google Photos and accessible from any device anywhere, anytime. You can choose Original quality or the free unlimited High quality mode.

Note the "Removing items" option. If you want files you delete in Google Drive from the cloud or from the local computer to be deleted everywhere without prompting then choose "Remove items everywhere". You can also be prompted to remove items or you can choose not to delete items on other devices which may leave lots of orphaned files behind.

If you have a large amount of data to backup the initial backup could take many days to complete but once finished it will only upload the changes as they occur.

If your G Suite license is for G Suite Basic ($5/user/month) you can store up to 30 GB of files, photos (original quality), and emails. Upgrading to G Suite for Business will give you Unlimited storage for $10/user/month (1 TB/user if 5 or less users on the domain).


G Suite for Business at $10/user/month is one of the most cost effective unlimited storage options available since it includes the full G Suite of software, Google Vault and more in the price. Dropbox charges $10/user/month for 1 TB of storage but it does not include email, calendar, Google Docs, Google Meet video conferencing, Google Sites, etc.

Google Drive Backup and Sync is also an excellent replacement to Crashplan who exited the consumer backup space this year.

Certainly contact us at Interlockit.com for assistance or to upgrade to G Suite Unlimited storage!

Tuesday, January 9, 2018

Achieving weight loss and fitness goals with technology

I love crafting business solutions and making software integrate seamlessly for our Interlock IT customers, but it's even better when those solutions can be leveraged to help with personal goals like weight loss and fitness.

Hopefully this post can help you achieve your weight loss and fitness goals by using technology to integrate daily activity level, exercise, and calorie tracking. Did you know that you can even sync your Polar Training Results and Training Targets into your G Suite for Business Google Calendar? This is a great example of IOT (Internet of Things) where multiple devices and software can work together elegantly.

Background and issue

I've been running consistently for 3 years, despite experiencing every pain imaginable as I adapt my lifelong computer nerd body to running.

One of my issues was being very hungry after a Sunday long run and knowing that I needed to eat some extra calories to refuel. What I didn't want to do is overeat and negatively impact my weight loss for the week. A fitness tracker live integrated to MyFitnessPal is a perfect solution to know how much to refuel and still achieve your weight loss goals.

Beginner tips

I recommend that beginners start with a couch to 5K program like C25K. I started with Runtastic and a Wahoo heart rate monitor in May 2015 which has similar beginner walk/run training programs. In fact, I've learned that easy slow running and keeping my heart rate below 130 for the majority of my training is a key to avoiding overuse injuries, consistently enjoying running, and race success. The hard push to 5K I used to do in University was inefficient and uncomfortable, and took the joy out of the sport.

My 2018 Goals

  • Lose 10 to 15 pounds of weight by April 30th
  • Beat my half marathon personal record (PR) of 1:38:14
  • Complete my first full marathon
I completed my first half marathon and set my PR in May 2017. This November 2017--despite sticking religiously to the Polar half marathon training program--I failed to set a new half marathon PR partly because I gained some weight. Losing ten pounds saves a whole minute on a 5K and almost nine minutes on a full marathon. You can see all my PR's and running stats on Strava

My Technology Solution for fitness and calorie tracking

MyFitnessPal

Setup and Configuration

The screenshots and setup below are specific to integrating Polar devices with MyFitnessPal but do some homework and you'll see that Garmin watches, Fitbits, Apple Watches and more can integrate your daily activity and training to MyFitnessPal too.


Connect Polar Flow App to MyFitnessPal

  • On your smartphone open the Polar Flow App, Settings, and toggle on Connect MyFitnessPal. Follow the prompts to login and Authorize Polar to read and write to MyFitnessPal.
  • Note that you can integrate your Polar Training Results and Polar Training Targets to your G Suite for Business or personal Google Calendar with the two toggles in the Polar App Settings (this setting is only available in the Polar Flow smartphone App).
  • Alternatively, you can configure the MyFitnessPal integration via your web browser. Open https://flow.polar.com/settings, click the Connect button for MyFitnessPal and follow the prompts.

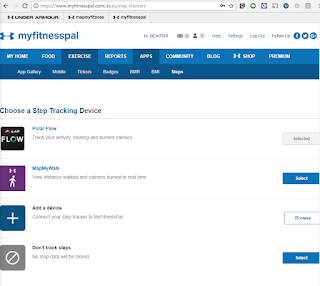
  • Next, inside MyFitnessPal on the web turn on Polar Flow Step tracking via the menu bar Apps, Steps. This means both exercise tracked and your steps for the day will be included in the "Exercise" Calories of MyFitnessPal:

Usage

Once Polar Flow is integrated to MyFitnessPal you should see "Exercise" automatically updated in the MyFitnessPal App and on the web from Polar Flow:
The data in the screenshot above shows my daily target of 1500 calories not including exercise; my food logged so far today after my lunch and afternoon snack of 1146; and my calories burned from exercise and steps of 520; leaving 874 calories to eat for my dinner and evening snack. The 1500 calorie target may see too low but remember that this is before exercise and steps (plus, I'm a small guy).

The exercise calories of 520 consists of my run, stretching, and Polar's estimate of my steps for the day:

Tip: Be careful not to eat the example 195 calorie "Polar Flow Calorie Adjustment" on workout days. It assumes that you'll achieve your Polar tracked daily goal of 100% or about 10,000 steps in addition to your workout so it can be overstated on your workout days. Throughout the day you'll see it change based on actual steps whenever your Polar watch syncs to the Polar Flow App. If you review the prior day "Adjustment" calories for the first while you'll get a better feel for how your activity impacts the adjustment. The next day (after a morning sync from your watch) is it adjusted to actuals and the calorie adjustment can even go negative (if you enable this setting in MyFitnessPal) to account for a low level of activity outside of your workout recorded.

Your Progress/weight is also updated automatically from Polar Flow to MyFitnessPal by either using the Polar Scale or by manually updating your weight in Polar Flow on the web in Settings: https://flow.polar.com/settings. You could enter your weight in MyFitnessPal directly but updating it in Polar Flow helps keep its calorie burn calculations more accurate and updates MyFitnessPal anyway.

Conclusions

Just like we can integrate cloud software for our business customers you can integrate your consumer devices into your Google Calendar, MyFitnessPal, Strava, and more to take advantage of each product's unique strengths. With cloud based solutions of today, integration is easy and reliable. Long gone are the days of running complicated unreliable synchronization software on your desktop computer just to get emails on your Blackberry or Palm device, yet many small businesses still suffer through similar headaches with their business software and email systems.

Contact us today at Interlockit.com and let us remove your IT headaches and software integration challenges!