That's where Interlockit.com comes in to save the day! We're getting straight into the technical details in this post, so put on your geek face and pour yourself a fresh coffee before jumping in.
Prerequisites!
- Access to a G Suite Super Admin account.
- Access to an Office 365 Global Admin account.
- One spare G Suite license to use as a role account.
- You will need to know how to connect to Exchange Online Powershell and run simple powershell commands.
- Users must not have matching accounts in both G Suite and Office 365; both systems will prioritize internal users and ignore Calendar Interop if an internal user is found during lookup.
Create role account
In order to facilitate sharing of calendar information between your G Suite and Office 365 tenant, a role account must exist on each side.
On G Suite
- Sign into your Google Admin Console and go to the Users section.
- Configure a new regular user account (no admin privileges) with an email address of your choosing. I recommend “interop@yourgsuitedomain.com”.
- It is recommended this account be used exclusively for calendar interop.
- Go ahead and set a permanent password right away and keep it ins a safe place. We will need to log in to this account to complete steps later in this guide.
*tip: leave the Admin Console open until you have completed this guide, as you will need it in following steps.
On Office 365
- Configure a new mail-enabled user (no additional privileges) using the New-MailUser cmdlet in Exchange Online Powershell. Example:
New-MailUser -Name "Calendar Interop" -ExternalEmailAddress interop@externaldomain.com -MicrosoftOnlineServicesID interop@your365domain.com -Password (ConvertTo-SecureString -String ‘yourpassword' -AsPlainText -Force)
- The name can be anything, so be descriptive.
- This email address must not exist in Office 365 as a user or contact. The role account shouldn’t need to receive mail, so it doesn’t really matter what address you use here.
- This email address must use an accepted domain in Office 365. This address will not accept mail, but behaves like the user ID for the role account on your tenant.
- Set any password you like. It must be within ‘single-quotes’.
- It is recommended this account be used exclusively for calendar interop.
*tip: leave Powershell open until you have completed this guide, as you will need it in following steps.
Create an Office 365 availability configuration
In order to give our Office 365 role account the ability to feed free/busy data to G Suite, we must create a new availability configuration and assign it to the role account using the New-AvailabilityConfig cmdlet in Exchange Online Powershell:
New-AvailabilityConfig -OrgWideAccount “Calendar Interop”
Make sure you use the same name in quotes used when first setting up the Office 365 role account.
Configure the G Suite admin console
- Sign into your Google Admin Console and navigate to Apps > G Suite > Calendar
- Scroll down and expand the “Calendar Interop Management” section.
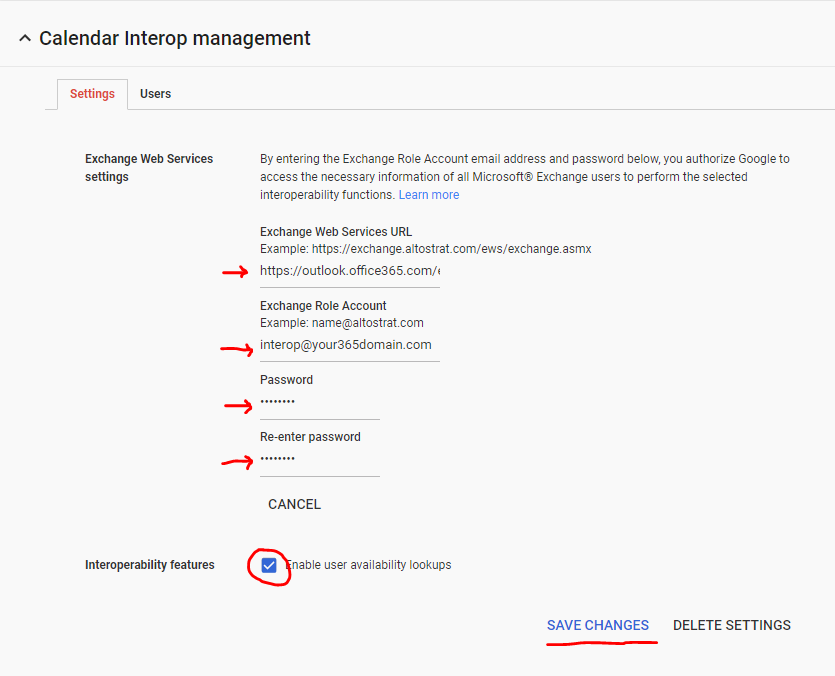
- Fill in the Exchange Web services URL for Office 365:
https://outlook.office365.com/ews/exchange.asmx - Enter the Exchange role account’s user ID (in our case, interop@your365domain.com).
- Enter the Exchange role account’s password.
- Check the box for “Enable user availability lookups”.
- Click “SAVE CHANGES”
Add the availability address space in Office 365
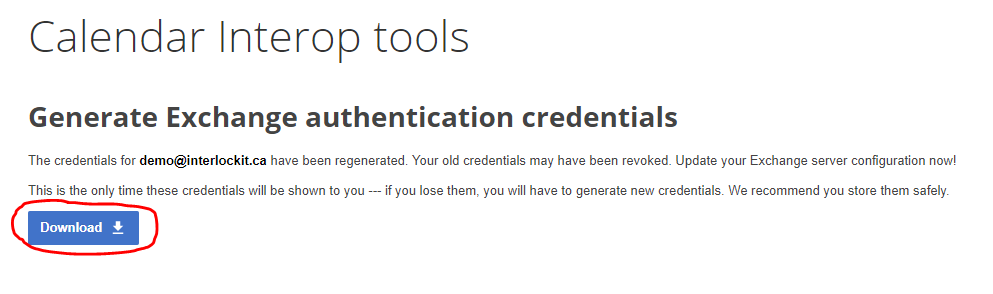
- From your G Suite admin account, open Google’s Credential Generation Tool. Check the box, and click “Generate new credentials”

- When prompted, sign in with the G Suite role account you created earlier. It will ask for permission to access calendar data. Click “Allow”.

- Click “Download”, and save the credentials.dat file somewhere safe--you will not be able to retrieve this file again in the future without breaking the setup, requiring you to repeat all the steps in this section.
- Open the Configuration Tool

- Click “Choose File” and select the credentials.dat file you downloaded in an earlier step.
- Select “Exchange 2013 or newer, including Office 365”
- Enter the user ID of the Office 365 role account, in this example we are using “interop@your365domain.com”
- Enter your G Suite domain in the field asking which address space you wish to add to exchange. In this example we are using “yourgsuitedomain.com”.
- Click “Show Exchange Setup”.
- You will be presented with the following page:
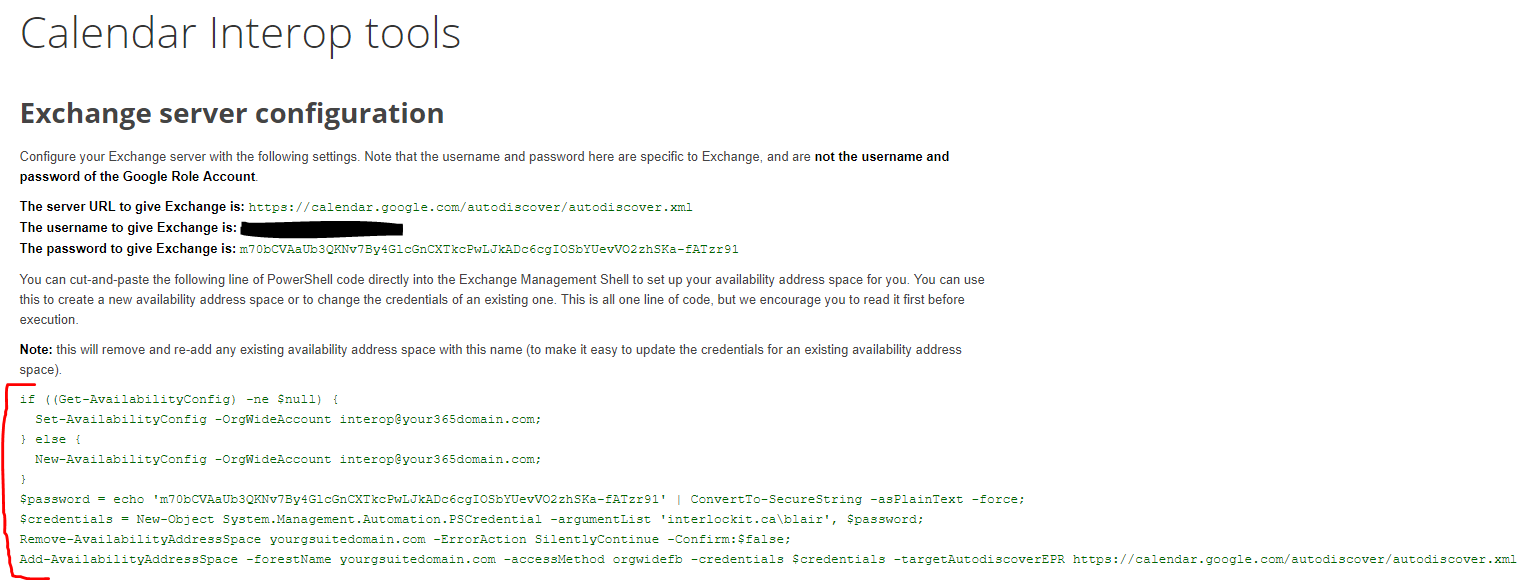
- Copy-paste the above section of green text into Exchange Online Powershell. You may need to hit “Enter” once each command completes, until all the commands have been run.
Create contacts for your G Suite users in Office 365
In order for Office 365 to display the free/busy data for a G Suite user, that user must be represented as a contact in the Office 365 system:
- You can add contacts manually in the Office 365 Admin center under the “Users > Contacts” section.
- You can use Exchange Online powershell to do bulk updates of contacts if needed.
You’re all set!
Now you can create a test event in a G Suite user account and an Office 365 user account respectively, to test that each are able to see the free/busy indicator of the other.
*tip: it may take a few hours for the Exchange Online settings in Office 365 to propagate, so if your initial tests don’t work, wait a few hours and try again before taking troubleshooting measures.
Google provides a Troubleshooting tool but it is limited in functionality. If you get lost, give me a shout over at Interlockit.com and we'll get you sorted in no time!
Now, don't you feel like you deserve another coffee?
HI, i wonder if you know about how this works in a hybrid exchange scenario. I already have this working with my on-prem exchange, but for the mbx's i moved to O365 this is not working. Wondering if it's possible to have 2 availability address spaces, 1 for on prem and 1 for o365 until we fully migrate. Thanks.
ReplyDeleteHi Robyn, Great question. I'd have to have one of our technicians dig into this deeper to see if it's possible. Happy to connect and learn more. Please contact us at interlockit.com. thanks.
DeleteWhat did you learn, did it work in Hybrid?
DeleteThanks for sharing :)
@robyn, did you learn anything interesting here?
ReplyDelete